The best high-mix machine shops run at over 90% machine spindle utilization – with no need to produce anything to inventory, or rework parts that are out of tolerance. Cutting tools are among the largest bottlenecks these shops have tackled. Whether your machine tools themselves are automated or not, your tool management processes matter. The higher your production mix and/or shorter your tool lives, the higher priority they become. Based on 40 years of automating milling and turning machine tools – and alongside optimizing cutting tool processes – we want to share our four steps to achieve high spindle utilization and excellent quality.
What Inefficient Tool Processes Cost?
How many different machining operations do you run every day? How many tools do each NC-program require? Ensuring that each machine tool always has the right set of tools loaded – with enough lifetime – is what every manufacturer aims for but struggles to realize. Inefficient cutting tool processes cause waste in many levels:
- Low spindle utilization: machines stop due to tool shortages or worn-out tools
- Scrap, rework and spindle crashes: the quality suffers – in the worst case the spindle crashes – due to error in tool loading or tool data
- Lot of time and money: high investment in sister tooling and tool personnel aiming to solve issues 1 and 2.
What Are the Best Cutting Tool Practices and How to Begin?
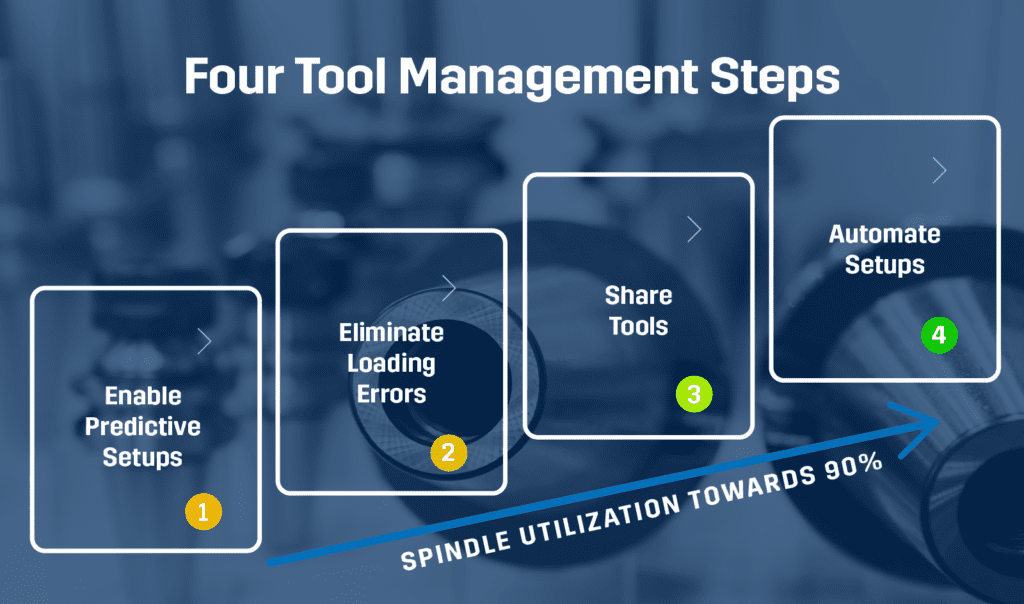
We use a 4-step approach to tackle the tool bottlenecks with our manufacturing customers. The number of steps to take depends on how complex of a tool environment does the manufacturer have – but we can tell that the first two are something every manufacturer should consider. The further you go, the better your spindle utilization and quality become! Tool management steps:
- Enable predictive tool setups.
- Eliminate tool loading errors.
- Automate your tools and share them between your machining centers.
- Automate your tool setups.
Step 1: Enable Predictive Tool Setups
Do you know in advance which tools you need, where and when? If not, your machine tool’s red status light is often on due to a tool missing or worn out tool. To give a bit of a scale to the problem, if you had four machining centers with four tool changes per hour during two shifts, you would change tools 96,000 times a year. If 10% of these changes caused a 10-minute waiting time (=you could not react immediately), your machines were stopped for 1,600 hours. That is 18% of your full year’s machining potential.
Being able to predict your tool needs based on your machining schedule gives your team an opportunity to (1) prepare the right tools BEFORE the machining begins, and (2) ensure the same tool is not needed in two places at the same time. To implement this, you don’t even need an automation – you need:
- your tools listed in a tool library
- your machining jobs scheduled in a software (can be ERP, can be MES, can be automation control software), and
- a software that integrates with the above two, and forms a tool schedule at least 2 days in advance.
Step 2: Use Presetter and Automate Tool Data
If your tool offsets are wrong, you either get inconsistent quality or in the worst case, the machine will crash. Both of them are a total waste of time and money, and they blow up the whole machining schedule because those parts need to be reworked – eating time from the other planned work. In the previous chapter we counted 96,000 tool setups in a year – even the most careful team cannot measure and input that much of data with zero errors. If your error margin was 1%, and 1% of errors would lead into spindle crash, it would mean 960 parts to rework and one spindle crash to repair every year.
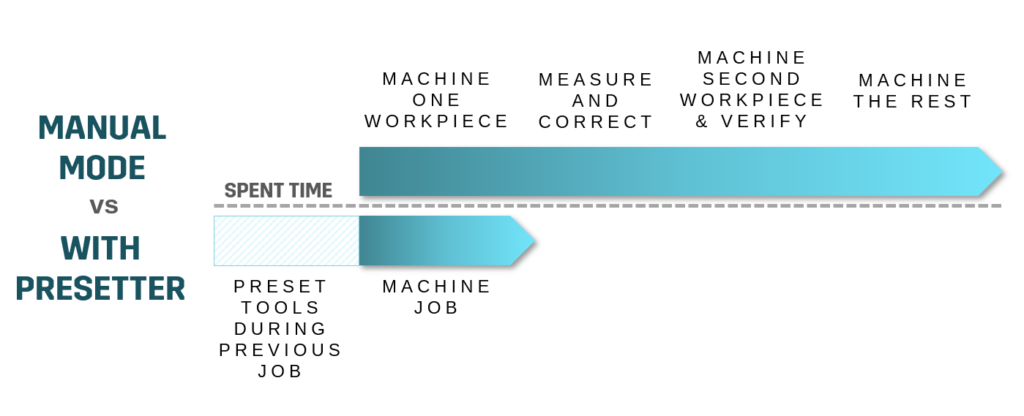
Our advise for every machine shop is: first, take a tool presetter into use. Using a tool presetter enables you to make presets already while the previous job is machined, and your data is 100% correct every time – saving a lot of time and effort from measuring, test runs and rework.
In addition to tool presetter giving you perfect data of your tool dimensions, we recommend you to enable automatic tool data transfers back and forth from the machine tools. This way you always have absolutely correct tool data in your tool library, and you don’t need to manually keep up with the tool wear data to plan the tool insert changes. So for this step, you need:
- step 1 accomplished,
- a tool presetter, and
- a software that integrates with your tool presetter, tool library and machine tools to transfer the correct tool data back and forth.

Step 3: Share Tools and Automate Tool Transfers
When your tool demand is high or the tool lives short due to challenging materials, you need operators constantly going back and forth, bringing worn-out tools into reworking and setting up tools for the next jobs. Even a small break to this service means that the machines will stop and wait for tools and the full machining capacity cannot be used. In addition, if each of your machine tools has its own set of tools, you are likely to invest largely into sister tooling.
In this kind of operation, you should not only consider automating your machine tools but also your cutting tools. Tool automation can store a large amount – thousands – of cutting tools centrally, and share those tools between your machining centers. Each tool is automatically transferred into a machining center right before it is needed in the production plan, and brought to tool room when it needs to be reworked. This way every tool is maximally used in whichever machining center it is needed, and the investment in machine tool magazines and sister tools is lower. The machine tools run without tool-related disruptions – also during lights-out hours. To enable tool automation, you need:
- steps 1 and 2 accomplished, and
- tool automation system that integrates with your machining schedule, and has enough tool pots and transfer capacity for your needs.
Here’s a YouTube video on how tool automation works in practice.
Step 4: Automate Tool Setups
If your tool lives are extremely short AND you constantly need renewed tools, you basically need people constantly just to renew tools. Even with a tool automation system described in step 3, you basically could not run your production lights out in this scenario. In addition, tool reworking can be heavy and risky work with certain kinds of large and sharp tools.
This kind of setting is the most typical when machining challenging materials and parts – for example in some of the aerospace components. What we recommend, is to automate also the tool setups as far as reasonable. Tool setup cell can handle tool wash, vacuum dry, presetting – and deliver tools to insert changing to an ergonomic tool loading station that accommodates several tools in rotating holders. Since the tool reworking happens partly automatically and the manual part can be handled in batches, the tool flow can be ensured for a longer lights-out periods. For automated tool setups, you need:
- steps 1, 2 and 3 accomplished, and
- tool setup cell that integrates with your tool automation system.
Learn the Best Tool Management Practices & Tool Automation in AMB and IMTS 2024!
Joining in AMB in Stuttgart or IMTS in Chicago in September? Join our “Tool Management Thursday” 12 September or reserve your own demo to learn more about this topic and see how flexible automation works in practice!

12 SEPTEMBER 2024
IMTS: Tool Management Thursday
Join our educational tool management sessions in IMTS to learn about the best cutting tool management practices, and to see a demo on how to integrate those practices with your CNC automation.

12 SEPTEMBER 2024
AMB: Tool Management Thursday
In AMB we are advising and demonstrating how to manage cutting tools in an optimal way, and how tool automation works for tool magazines and turning machine tool turrets. Join the sessions in the booth program or book your own demo!